Categories
DIY Energy Saving Environment Solar Energy Water

Skid Mounted Mini Pump

For irrigation of small farms where water source is available nearby (either an open well, pond, lake or any such water body) it is possible to use small pumps and operate them on solar panels.

छोटे खेतों की सिंचाई के लिए जहां पानी का स्रोत पास में उपलब्ध है (या तो एक खुला कुआं, तालाब, झील या ऐसा कोई जल निकाय) छोटे पंपों का उपयोग करना और उन्हें सौर पैनलों पर संचालित करना संभव है।

These pumps are easily available at reasonable prices online as well as in local market in most of the cities and small towns accessible to farmers. They are used very commonly in battery operated backpack sprayers used for pesticides.

ये पंप अधिकांश शहरों और छोटे शहरों में ऑनलाइन और साथ ही स्थानीय बाजार में उचित मूल्य पर आसानी से उपलब्ध हैं। वे आमतौर पर कीटनाशकों के लिए उपयोग किए जाने वाले बैटरी चालित बैकपैक स्प्रेयर में उपयोग किए जाते हैं।

This post explains some important aspects of this type of pumps for use at small irrigation sites.


यह पोस्ट छोटे सिंचाई स्थलों पर उपयोग के लिए इस प्रकार के पंपों के कुछ महत्वपूर्ण पहलुओं की व्याख्या करता है।

Such a pump is run by a DC motor and has a PVC block head where positive displacement of water is achieved by action of miniaturized pistons inside the block.


ऐसा पंप डीसी मोटर द्वारा चलाया जाता है और इसमें पीवीसी ब्लॉक हेड होता है जहां ब्लॉक के अंदर छोटे पिस्टन की क्रिया द्वारा पानी का दबाव बढाया जाता है।

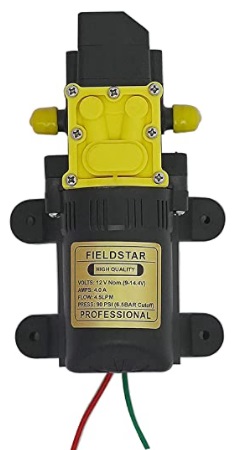
A pump having single motor is often priced at 550 to 650 INR and delivers upto 3 LPM water and claims to generate pressure of 70 PSI or 5 Bar i.e. upto 50 meters of height.

सिंगल मोटर वाले एक पंप की कीमत अक्सर 550 से 650 रुपये होती है और यह 3 लिटर प्रति मिनिट तक पानी दे सकता है और 70 पीएसआई या 5 बार यानी 50 मीटर ऊंचाई तक का दबाव उत्पन्न करने का दावा करता है।

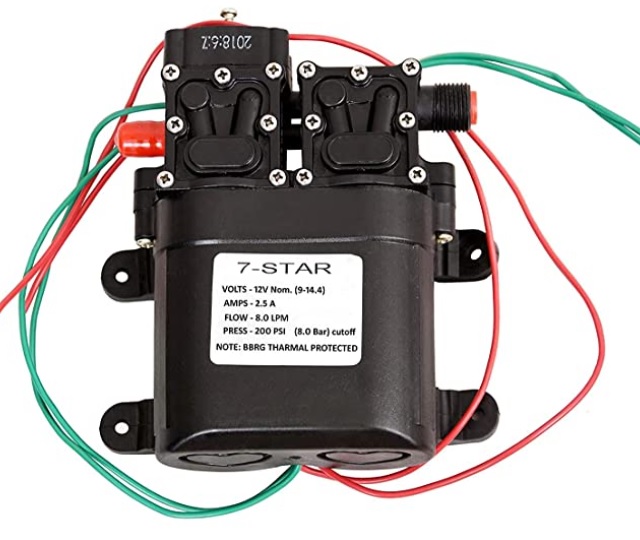
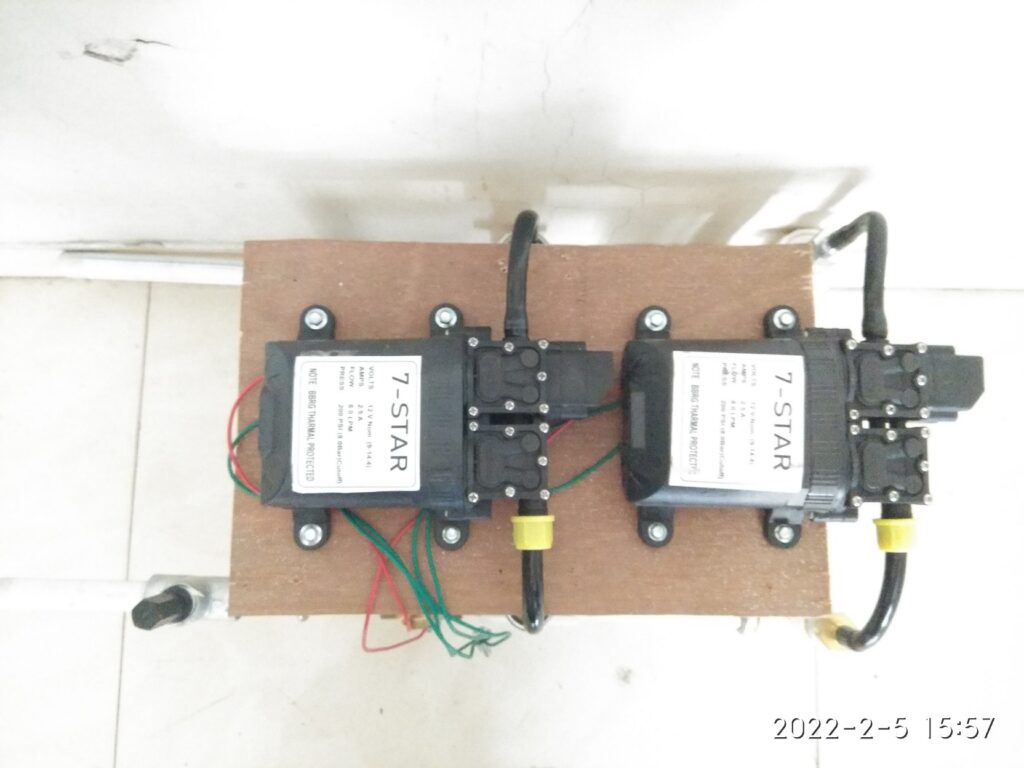
Pump with twin motor is also available and priced at 1000 INR, delivers 5 to 6 LPM of water at similar pressure.

 दो मोटर वाला पंप भी उपलब्ध है और इसकी कीमत लगभग 1000 रुपये है, समान दबाव पर 5 से 6 लीटर पानी की आपूर्ति करता है।

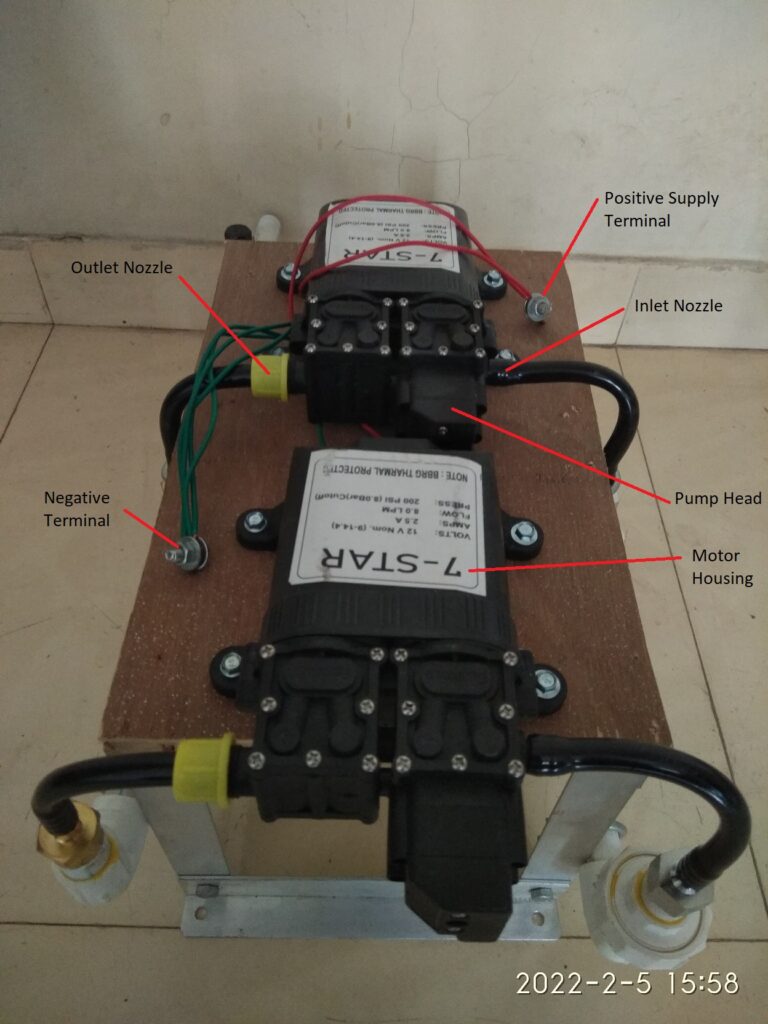
Next two images show a single motor and dual or twin motor pump.

अगली दो छवियां एकल मोटर और दोहरी या जुड़वां मोटर पंप दिखाती हैं।

The DC Motor used is a DC motor with brushes and follows a standard specification named as 775 motor, some details can be found here.

https://somanytech.com/what-is-775-motor/

The motor can be operated over a wide range of DC supply voltage (6 to 36VDC) but the pump manufacturers normally mark the pump for operation in range of 12 to 14.5 VDC only.

We have installed such pumps at a couple of sites and safely connected to solar panels of 12VDC nominal (or 18VDC MPPT voltage). The motor of the pump nicely works with the electricity generated by solar panel during the daytime. As the intensity of sunlight changes throughout the day, the output flow of water varies and is acceptable for the irrigation purposes.

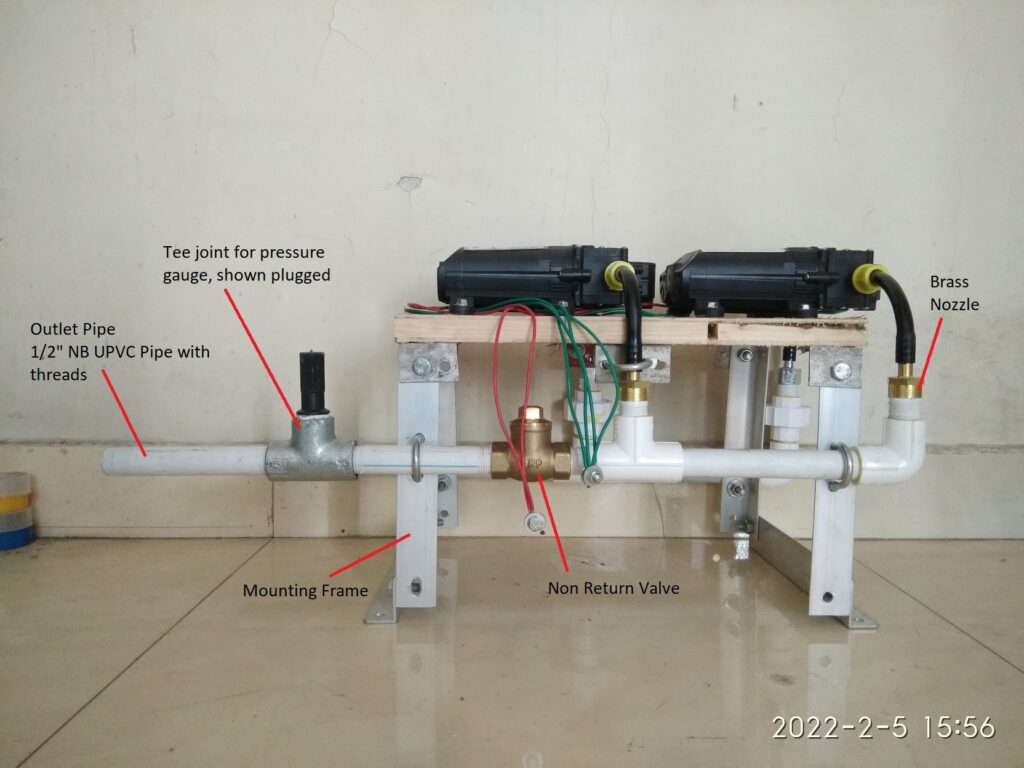
Inlet and outlet of the pump is however a non-standard (or at least not easily available) tubing size. Most suppliers provide a PVC/HDPE tube with threaded PVC nut to attach to the pump outlet nozzle, but the connectors with standard pipe sizes (say 0.5 or 1 inch nominal bore pipe) are difficult to find.

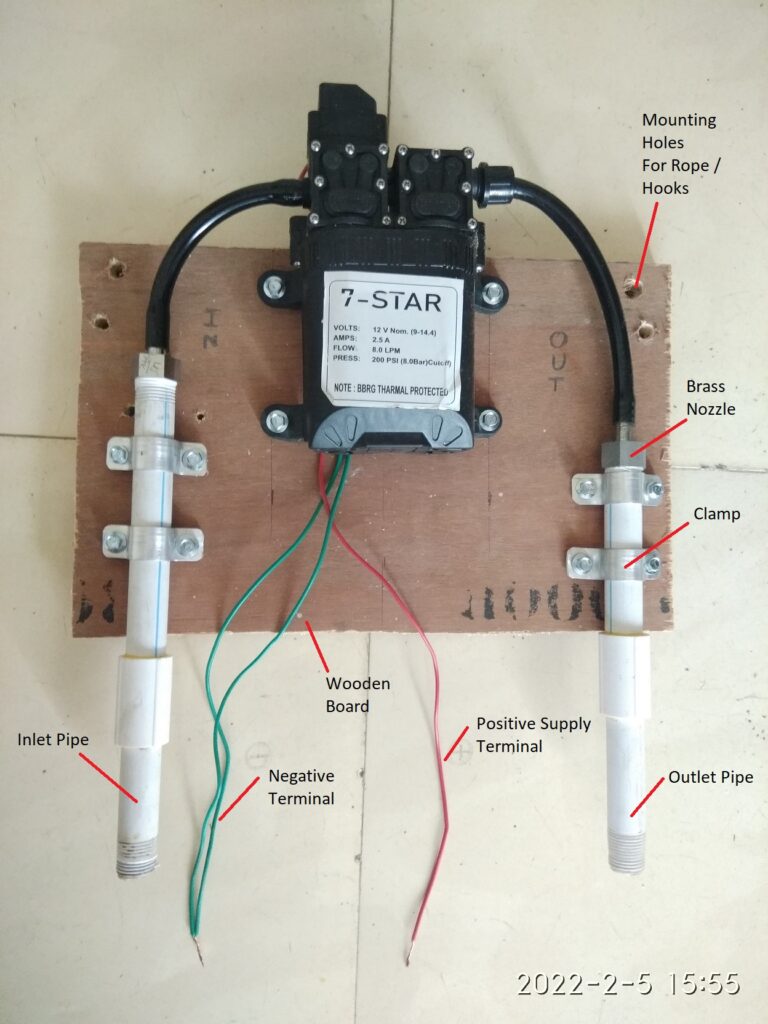
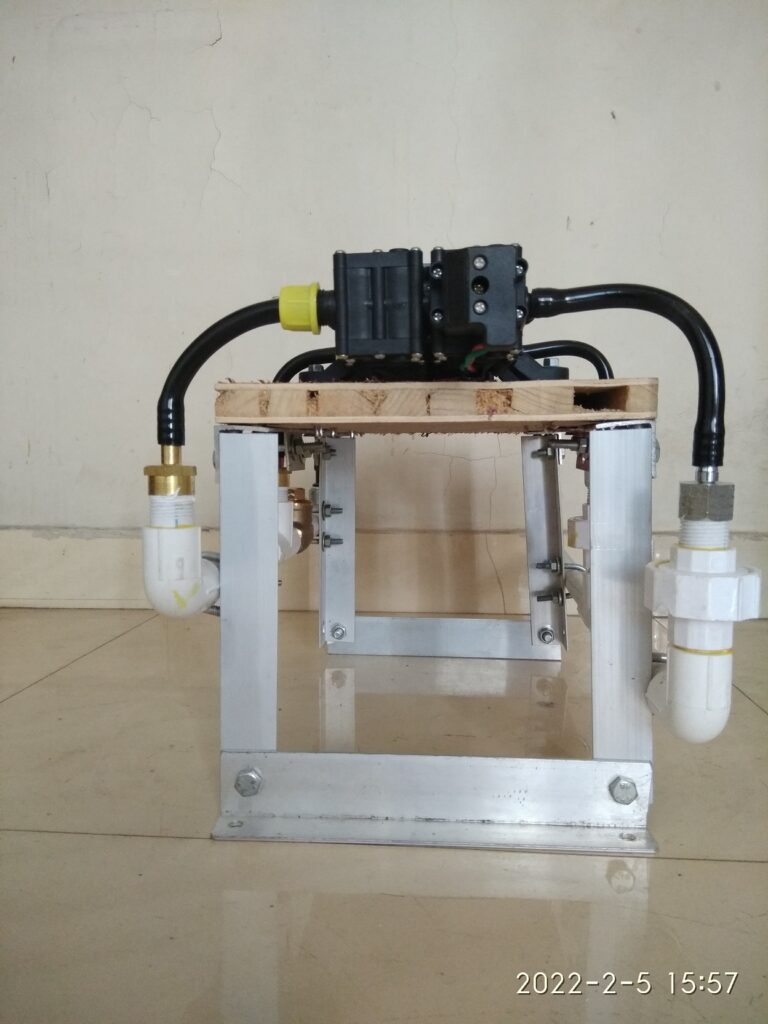
We have used a typical nozzle connection seen in pictures and created a simple skid mounted assembly of this type of pumps, eiether one pump on the skid or 2 on the skid as per the requirements.

With 2 pumps on the skid it is seen that 150 to 200 watt panels are adequate for operation throughout the day. For single pump a panel of 75 to 100 watt is appropriate.

Next few images explain the mounting approach we have used and is only a suggestion. Any suitable alternative can be followed that meets the needs and materials availability at the installation site.

Single Pump Skid

Dual Pump Skid

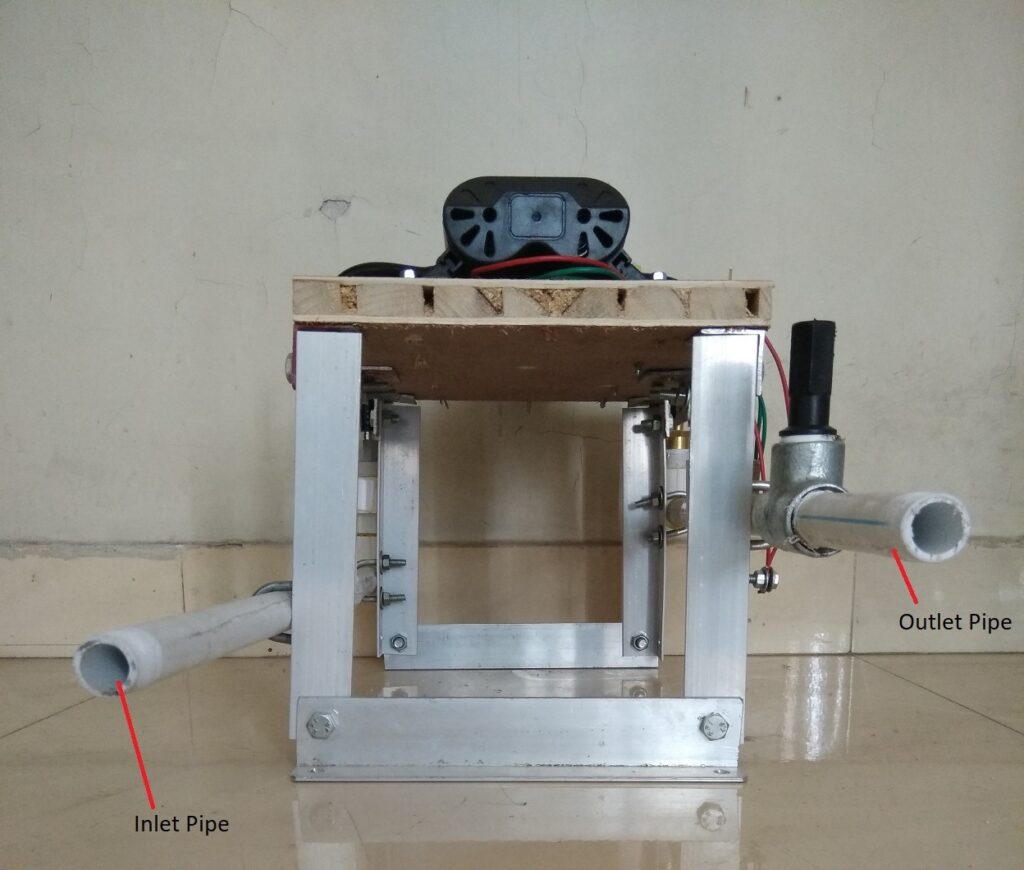
Front view of the pump skid with inlet and outlet pipes on left side.

Seen from top at an angle / 3-D view.

Left Side View

Rear View

Right Side View

Top View

Important Instructions

  • Pump and motor must never be submerged in water and water must not get into the motor.
  • DC power supply polarity needs to be correctly followed. Green wires to be connected to negative terminal of the battery or solar panels, and red wire to positive terminal.
  • DC supply voltage must never exceed 18 volts.
  • In no case, AC supply / mains supply shall be applied to the motor, it is hazardous besides the fact that it will permanently damage the motor.
  • Testing of pump without water by supplying DC power for a second or say two seconds is ok, but must not run the motor for longer duration without water.
  • At the inlet pipe a suitable filter in form of nylon mesh is highly recommended. The internal piston mechanism of the pump is too small to get clogged by smallest of the particles.
  • This type of pump can generally start from dry run and can self prime in a few seconds, but if it does not do so, please do not run it dry for long time. Instead open the nozzles and check if any clogging or blockages. Try to pull water from outlet nozzle or pipe by sucking the air.
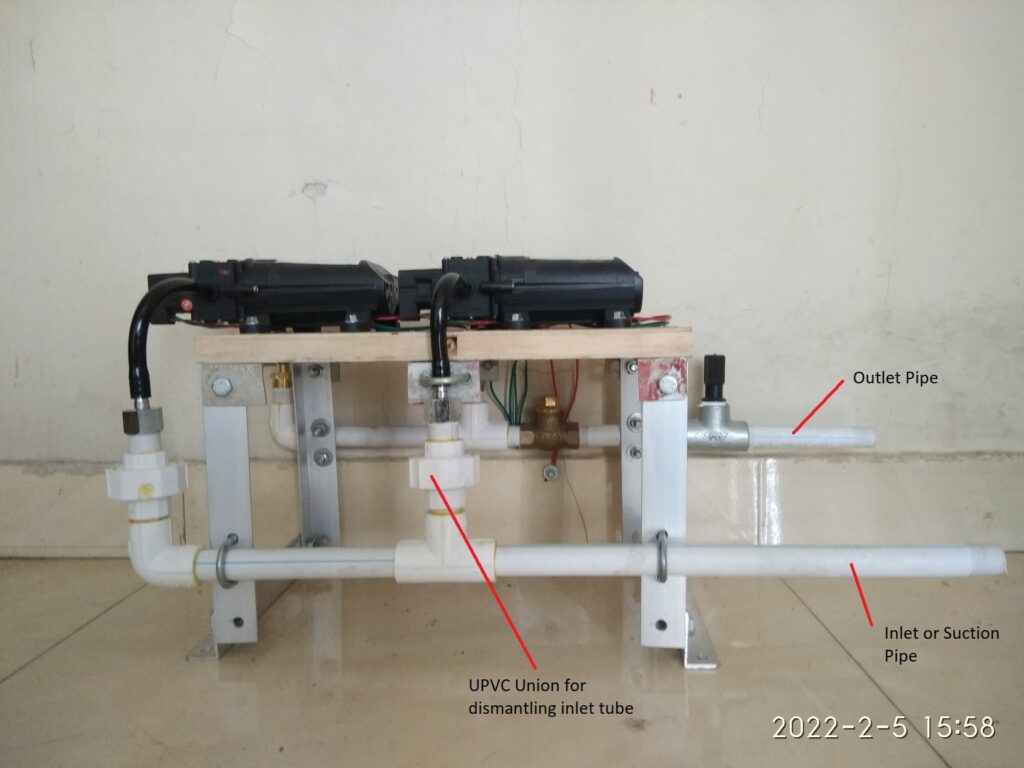
  • The pump can lift water from upto 5-6 feet on the suction side, however it is better to keep the suction pipe length as small as possible.
  • It is recommended to install a footvalve at end of the suction pipe submerged inside the water, it is best to attach a filter mesh around the footvalve.
  • Make sure that the pump skid is mounted on a sturdy platform or base. Alternatively pump can be suspeneded firmly inside an openwell clearly above the water level.
  • Use solar panels of 12VDC nominal voltage only, any higher voltage panels if connected to the pump will damage the same. It is better to first check the nameplate on the backside of the solar panel before connecting for the first time. The nameplate should read 12VDC nominal and/or 17-18 VDC MPPT or maximum power voltage.
  • Single pump skid is suitable to operate with 75 to 100 Watt panel and dual pump skid with 150 to 200 Watts. Excessively higher wattage of the solar panels must be avoided.
  • This type of pump is supposed to be used for intermittent duty only however through our experimentation in actual sites, we find that using the pump every day for 3 to 5 hours is fine.
  • Connect the outlet pipe with suitable coupling or union with the delivery pipe to be arranged at the site to suit the distance of the final delivery location away from the water source.
  • Ensure that the inlet and outlet pipe connections do not lead to forces on the pipes or the skid.
  • If in doubt please reach out to us through email or phone.
Demonstration of 3 pumps at a site in murbad

Update on 21-Sep-2022

We have taken measurements of the pressure and flow generated from this type of mini pump and the videos below are useful to understand the performance.

It was seen that when operating with a 16VDC power adapter one twin pump could produce 2 Bar pressure (20 mtr water column equivalent).

At 1.5 bar the pump delivered 180 LPH and at 1.0 bar the pump could deliver 300 LPH of water flow.

Categories
Environment

Mini Weather Station (DIY) – Part 2

Since the concept was posted in the previous blog Mini Weather Station, many friends and readers reverted with various points and questions.

Trying to address them here.

Open for comments and more questions please….

Why DIY Weather station

Do It Yourself gives a full control and understanding about what and how a certain thing is being implemented and it gives a very good hands on experience. Starting with concepts till actual deployment of the gadget, a DIY weather station is your own mechanism to accurately and directly measure and record the climate and climate changes in your area.

Pre-requisites

What all you need, is below…

  • A ventilated outdoor space, it can be a balcony / terrace, but no direct sunlight and no direct rainfall, at least where the device will be mounted.
  • A continously available WiFi data network.
  • Source of electricity to power the device.
  • Enthusiasm to participate in climate change and related activities.
Weather already on my cell phone.

Yes, smartphones of current generation do have some kind of temperature and weather data displayed on the home screen.

  • There is a very rare possibility that your phone has an actual temperature sensor inbuilt in its hardware Environment Sensors in Phones.
  • Even if there is one such sensor, the temperature displayed from time to time will be at various places including indoor and outdoor as the phone is carried along by the user. And we want to record and track the weather conditions at a specific open ambient place.
  • On most common phones i.e. without a temperature sensor as a part of their hardware, the displayed value is often fetched from some weather services website like AccuWeather
  • Real time data shown from such websites is a fairly complicated calculation, which involves the actual readings from the nearby weather stations (official, public, private, owned by government bodies or institutions) + the data continuously recorded by weather satellites at various locations. Weather satellites donot measure actual temperature but infer the values based on infra-red scanning of the earths surface. How does weather satellite work
  • So the correctness of the temperature displayed on the home screen of your phone is dependent on several factors like the distance from the nearest weather station and weather satellites.
  • Also it is important that we should be able to record data at regular intervals and later be able to compare the values year over year in form of daily, weekly, monthly and yearly min,max and average/median temperatures. Most weather services websites donot provide historical datapoints easily and free of cost.
  • There are not many known/closely located weather stations in India, or at least information about them and their readings are not published.
  • Looking at all the above points, it will be meaningful to have more weather stations through public participatory approach at various places. The data can be valuable in terms of analysing the effect of trees, water bodies, streets congested with traffic, and seasonal changes on the ambient temperature.

Why invest in a weather station?

This is purely optional and voluntary. If anyone wants to participate, it is for his/her own interest in and commitment towards protecting the environment and addressing issues related to the environment. There are many many ways in which efforts can be put in to preserve our environment. Participating in this weather station initiative is just one of them.

Costing

The cost of components used in the DIY weather station is about 1100 to 1300 INR. We are happy to assemble/package the components in a working unit and provide to the participants willing to install at their place. The recurring cost of operations is mainly in two parts.

  • Cost of the wifi data – It is estimated that the unit will post 100 characters of data over your local wifi connection every 2 to 5 minutes, that is about 72KB of data per day, lets say not more than 1 MB per day. This is really not much of data for an existing internet connection. With current data quota values supported by most of the broadband and mobile service providers, this is not likely to incurr any additional costs.
  • Cost of electricity to run the device – It is measured to consume between 2 to 3 watts of electrical power continuously, this means that within 14 to 20 days of operation the device will consume 1KWH unit of electricity, amouting to about 4 to 8 INR, which means an additional monthly electricity bill of about 10 to 12 INR
Don’t have a WiFi connection

In such a case, a dedicated mobile-SIM based data connection with a WiFi dongle can be arranged, but that will mean additional costs.

  • One time cost of the dongle device – approximately 1000 INR for most service providers.
  • Recurring monthly cost of service provider – It is approximately 100 INR at a minimum with most of the service providers in India. If there is any service provider which supports much lesser monthly charges with low data quota per day (we are ok even at, as low as 10-20 MB per day, literally) then it will be more practical.
Categories
Environment

Mini Weather Station (DIY)

A simple Arduino based weather station is installed outside of the window of my house in Thane, Maharashtra, India 400602.

Weatherstation Device

Supported by the home WiFi network it keeps logging the temperature and relative humidity data to the Thingspeak platform. All / most of the components used are open-source and easily available in local electronic market or online.

And the data is logged every 2 minute thus near realtime…….

The weather data can also be viewed at the link https://thingspeak.com/channels/566830

Temperature DegC for last 2 days

Relative Humidity % for last 2 days

So far, 2 years of data has been captured at every 2 minutes. The trend is typical and repeats every year with a few changes.

Can this data be used to conclusively confirm about global warming and climate change?

May be not.

It requires many years (5 or 10?) of data to be logged and also at various multiple locations.

So, anyone interested in installing such a weather station?

The device is about 1100 to 1300 INR for the cost of components, and may take upto 2 to 5 watt of continous power consumption and about 2MB data per day.

If anyone is keen to track the local temperature and humidity, please get in touch.

It is a small device about 4 x 4 x 2 inch PVC box and need to be installed under some kind of weather shed.

All you need to have is below.

  1. A ventilated outdoor space, it can be a balcony / terrace, but no direct sunlight and no direct rainfall at least where the device will be mounted.
  2. A continously available WiFi data network.
  3. Source of electricity to power the device.

It will be really great and interesting, if we team up for multiple such stations at various geographical locations.

Categories
Environment

Carbon Footprint

This may sound to be only a jargon. But in simple words it means the amount of carbon dioxide (and heat energy) gets released in environment due to activities of a person or of a community – either individually or as a group.

And why should one be worried about this? Short answer is – more the CO2 and/or heat released in atmosphere more will be the adverse impact on weather, surroundings, flora and fauna and even the seasons and annual cycles of rain and winter and summer.

This can be calculated or estimated to a very accurate detail but will need lots of data.

So here above is a simple calculation for typical urban or semi-rural lifestyle of current days. As of corona outbreak the human activity has significantly reduced worldwide and so is the impact on environment – expected to have reduced.

Please go through the list and verify how much is your contribution.

Comments please.