Internet of Things (IoT) is about connecting various devices (sensors, controllers, display units, alarms and any such instrument/equipment) with each other using public internet and may partly run through private network of the end user.
With this primary capabaility, IoT opens out many opportunities for systems control, remote data monitoring and to execute commands that carry out various operations based on desired conditions.
With improved data connectivity and availability + the reducing prices of electronic devices, IoT is picking up fast and more importantly it is also getting easier for hobbyists and individuals to deploy IoT projects all by themselves.
Besides the hardware and software to implement any IoT project, what is equally important is a consistent and fairly reliable mechanism to receive and store the data points in a (near) real time manner.
Setting up such a data store can turn out costly, but there are many such online services available. For industry grade volumes and quality of service/reliability, such data logging services providers offer various plans with different charge structures.
For hobbyist and DIY users, most if not all these online services offer a free option but obviously with limited resources granted to the user.
A few of the popular service providers are listed below, this is just a very small list.
Let us see how to open an account and create a data logging channel with one of the service providers, namely thingspeak.com
Create an account with ThingSpeak
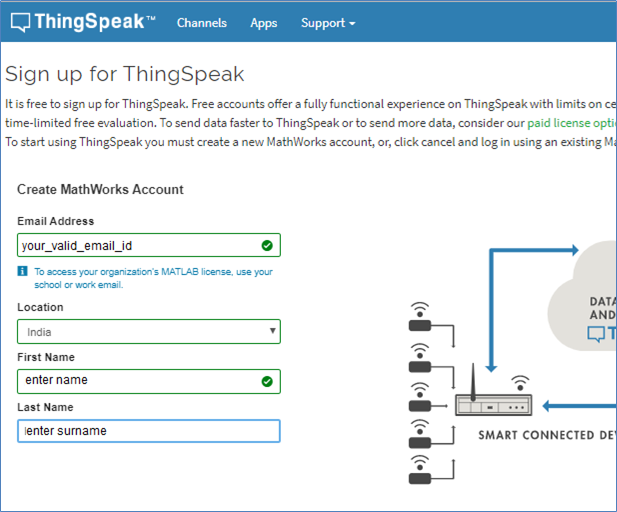
From your computer or mobile phone connected to internet, open the web browser and go to the URL link ThingSpeak SignUp
Enter your email address and Country and First Name, Last Name on the sign-in page, then click Proceed / Next / Continue button. We recommend using the same personal Google email id as you use on your mobile phone google account.
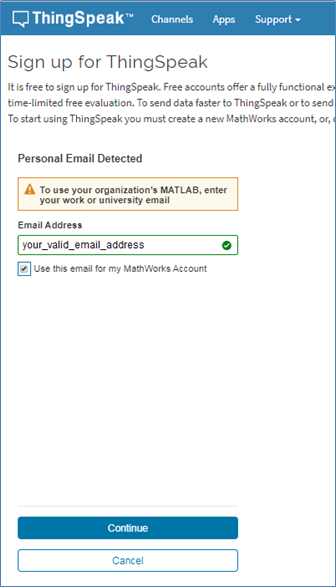
It will warn you about your email address being personal email id. Refer the image below. Please Tick / Select the check box near Use this email… and click Continue button. After this it will display a message mentioning about having sent a link to your email address.
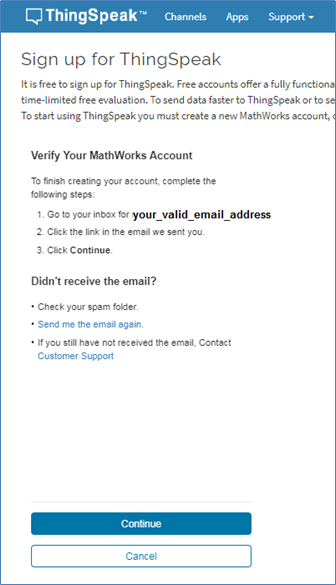
Open your e-mail box and find the mail received from ThingSpeak, check if the email has gone into spam folder. Please ask for resending the mail again, if required, by clicking the Send Me the Mail Again link.
Locate the URL link available in the email that you received and click the link or button or copy paste that URL link in a new browser tab/window. Please keep the previous tab/window of ThingSpeak still open for further use.
This new tab/window (not shown here) which you opened from your email by clicking the verification link / button – will show some message like your account/email after successful verification. This is actually a mathworks account which is another website like ThingSpeak, both of which share common authentication and some other such few features.
After this verification is successful, resume in the previous ThingSpeak tab/window, by clicking the Continue button.
It will take you to sing-up page where you will be asked to specify your user id and password for ThingSpeak login. Please set a valid user id and password for your ThingSpeak account, this is entirely different and not connected with your email address. Remember and/or note down the user id and password for future use.
Then proceed to login to ThingSpeak web site or you will be automatically logged into ThingSpeak.
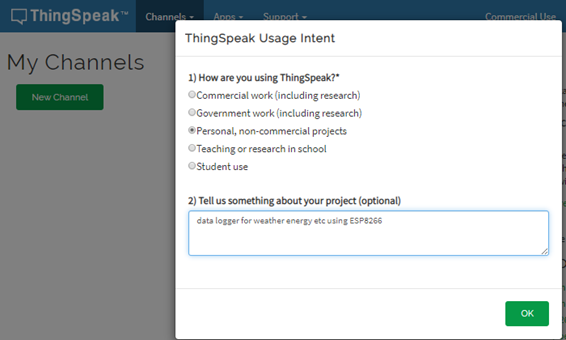
At the first login it may ask for some additional information like – what purpose you plan to use ThingSpeak for, (refer next image). Please specify non-commercial/ personal use and click ok.
Create Channel
A channel is one identifiable register/data store to capture data.
For example let us say – a user has 2 different locations where he /she wants to monitor the ambient temperature and humidity at every 5 minutes continuously.
To be able to do this the user will setup the needed sensors at the respective locations and data acquired by the sensors will have to be posted to some internet based URL. This URL will receive the data values and store them for later use and analysis.
For this example, the user needs to have two different registers or data stores one per location and each register needs to support at least three fields (namely timestamp, Temperature in deg C., Humidity in %).
So it is like two readings one each for the two locations, comprising of 3 field values each will be received and saved every 5 minutes. That is 576 readings per day and over 2 years it will be around 0.42 million or 420000 readings. Each reading is about 40 bytes say, so just 16 MB of data over 2 years. The data volume for these two datastores is not really that high, but it is important that the datastore has to provide a reliable and continously available mechanism of data logging.
When translated in the terminology of ThingSpeak, this means two channels one each with 3 fields of data are necessary to be created.
Thingspeak allows upto 4 channels to be created by every user having a free account.
So let us see how to create a channel.
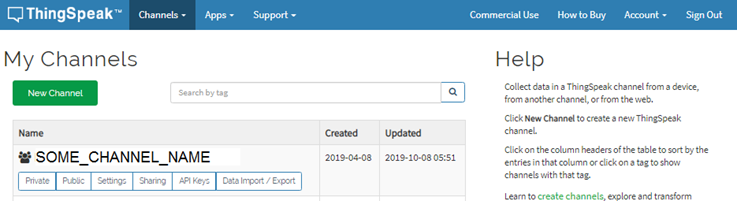
After the ThingSpeak login account has been created and successfully logged in, it is required that a new channel be created in the page shown below.
Click the New Channel button, the website will take you to next page.
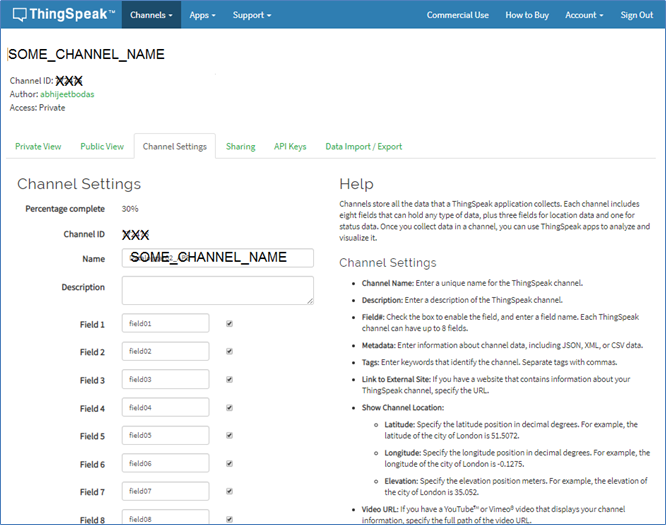
On this page specify a channel name and select / tick against all the 8 fields shown in the page. Then click Save Channel button. There are other two buttons provided as below
- Clear Channel – This clears the old data that may have been captured so far in this channel. It is recommended to not clear the channel unless you are sure that you want to lose the data forever.
- Delete Channel – This deletes the channel altogether. It is strongly recommend to not click this ever, especially after any of the field device is using the channel.
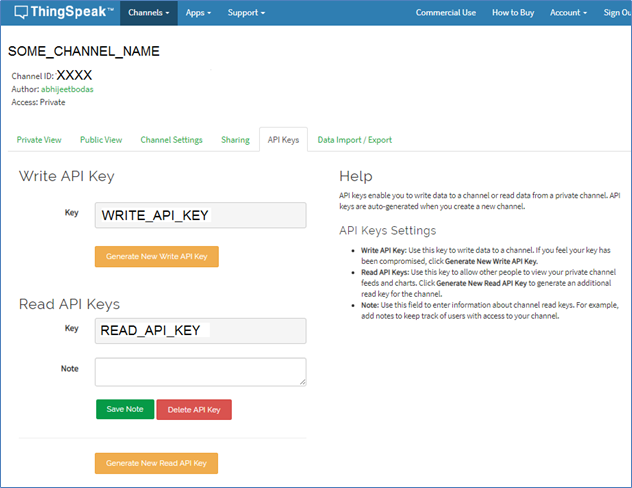
Important Parameters of the Channel
Please note down the Channel Id, Name and Read and Write API Keys, as it shows in the web page in the API Keys tab. Once the channel is created the Keys and Channel Id can be used by any device/software so that the data to be collected by any field sensor or device can be posted to the channel. These values can be altered any-time by the the user login who created the channel, but if the channel keys are setup in any IoT device as a part of one time configuration then the altered values (especially the Read and Write API keys) need to be updated in all the devices and programs where the old keys were used.
Verifying the channel
Once the channel is created it can be tested by executing below commands in browser address bar.
Write to Channel
https://api.thingspeak.com/update?api_key=WRITE_KEY&field1=123456&field2=0.56
The above comamnd submits and saves one data point with values of two fields to the respective thingspeak channel with matching WRITE_KEY.
Read Channel
https://api.thingspeak.com/channels/CHANNEL_ID/feeds.json?results=20
This comamnd retrieves 20 data point from the thingspeak channel specified by the CHANNEL_ID
View the data graphically
Thingspeak provides a nice and simple way to view the datapoints. It would be a good activity to explore this part in details to understand what options it gives to view the data, i.e. various types of graph, number of datapoints to be viewed etc.
https://thingspeak.com/channels/CHANNEL_ID/private_show